Indian Performance Valves and Springs
General Information
Indian motors, whether Chief, or Scout have very large valves. Some feel they are too big. That's probably why the factory gave the cams so very little lift. In the 21st century, motors are designed with smaller valves, and higher lifts to try to keep the gas velocities higher when passing through the opening valves. We have big valves, and we have to deal with it. I feel that the rest of the motor can be upgraded to take advantage of the big valves. I have no problem doubling the power of an Indian motor, and in doing so, the valve size is no longer too big. Big valves are very heavy, though, and they will float at high RPM unless the spring tension is increased. Increasing spring tension, without lightening the valve train just adds wear to all the components involved from cam bushings, shafts, lifter rollers, lifter arched pads, and valve adjusters. It is very important to keep the lifter rollers pinned to the cams, so they don't skid down the cam lobe after floating! Therefore, it is a very good idea to find a way to reduce the valve train weight. I make Titanium retainers for the springs that reduce quite a bit of weight. The factory Bonneville springs added 25% more spring pressure to an already super weak single valve spring (which coil-binds at .375" of lift), and just adds more moving mass to each valve.
I begged Gary Stark to have a large batch of new 7-coil valve springs made, which do (3) things. First, they increase the spring pressure from 140 pounds per (1") inch of compression on a stock 9-coil spring, vs. 162 pounds per inch of travel on the new 7-coil spring. The second thing they do is to prevent coil-bind, which happens to a stock 9-coil spring at about .375" of lift. Third, they reduce weight. Even though the spring doesn't move up or down, it has a mass at the spring retainer end that is, indeed, moving up, and down at high speed, so spring weight adds to the overall valve train mass at high RPM's. These 7-coil springs are about 26% lighter than the 9-coil spring, and maybe 40% lighter than the Bonneville "double spring" setup. Bonneville Chiefs, and Bonneville Scouts both used this 9-coil outer spring. The Bonneville Scouts wouldn't have suffered coil-bind at their .325" of lift, but the Bonneville Chiefs, as well as 80" motors with .410" of lift will always coil-bind. There is a minimum of .010" space required per coil at max-lift, and the 9-coil springs can't do it. The 7-coil springs work with very high lifts. They can also be shimmed tighter to further increase spring pressures.
Idealy all (4) valves should have the same spring pressures, and you will have to measure for that. I have found that an Indian needs at least 100 pounds seat pressure, and I shoot for 105 pounds, but not more. This is actually not much pressure, but adequate for 5,000 RPM. At around .400" lift, these pressures would become around 175 pounds. Again, barely adequate, but it is best to not go too high to try, and save the rest of the valve train. I have a "Valve Spring Study" that is a menu choice on my Indian Tech Talk page. Read it!
Indian Valve Springs
As I mentioned above, there is now an option for the best Indian Valve Spring ever offered to the general public. It is the new 7-coil that Gary Stark of Starklite is making. I always like to give credit, where credit is due. Jim Parker from "Parkers Indians" in Melbourne, Australia developed the 7-coil springs, and he sent me a set for my "Super Chief". I immediately saw that these were the best way to go. It has the same wire size, and material that the factory used from the beginning. But, since there are 7 coils, instead of 9, it has a higher spring pressure rate. The 9-coil springs offered 140 pounds of pressure at (1) inch of compression, and the 7-coil spring offers 162 pounds! The other, and even more important reason for using these springs with high lift cams, is that they will not "coil-bind" at the top of cam lift. The 9-coil springs become fully compressed at around .375" of lift, where the 7-coil springs won't "coil-bind" until over .600" of lift. This extra space, allows shimming under the spring to further increase spring pressures if desired. The dimensions of the 7-coil spring are the same as the original 9-coil, so they fit the environment well. A 741 from the factory had a slightly shorter 8-coil spring than the Chief, or Scout (Scouts, and Chiefs always used the same springs). For that reason, I feel you could still use the 7-coil spring, with it's increased spring pressure, and it would still fit well in a 741. I haven't yet had the opportunity to install, and measure the spring pressures in a 741, though. In my Twin-Scout, I use the 7-coil springs, which made around 98 pounds of seat pressure with NO shimming under the springs. I found some signs of valve float, so I shimmed them up to reach 105 pounds of seat pressure. Now I have no more valve float. One major consideration is that I use Titanium valves, retainers, and keepers, which ALL weigh only 60% of the stock parts, so with all steel parts, those pressures would need to be increased. My Twin-Scout motors use the 4 7/16" stroke, like a 74" Chief, so my RPM range is more like the Chief, than the 3 1/2" stroke Scout, which should definitely rev higher. I assume that a high revving 45" Scout might need somewhere between 115-120 pounds of pressure. The way to tell if you have valve float is to check the rear cylinder's lifter "arched pads" that contact the push rods. If they float, they will hit the bottom of the push rod guides, and leave some very faint "witness marks". So, make sure at every rebuild, that you sand, or polish off any previous marks from the lifters, so new marks will show up.
There are always those guys that are trying to completely re-invent the valve train for Indians, but I don't feel that it is necessary. By using the 7-coil springs, and playing with spring seat pressures, you will get good results. My Twin-Scout seems very happy with my setup, and I routinely rev it to 5,700 RPM when shifting from 4th to 5th gear at speeds over 150 MPH. You never want to run too much spring pressure, because it will take a toll on your lifter rollers, and cam bushings. My Scout racing lifters with needle bearing rollers are a big help, but the cam shafts, and bushings can still take a beating with too much spring pressure. Finding ways to reduce the rest of the valve train weight is another good way to preserve the rollers, and cam bushings, because less spring pressure will be needed.
Indian Valves
Indian valves are very large diameter (2" for both Chief intake & exhaust, but 1.75" for both Scout intake & exhaust). The intakes aren't necessarily to big, but the exhausts are. Exhausts being too big, is less of a problem than too small of an intake valve. When I do a porting job, I like to taper the exhaust port, from bigger at the exit of the port with a smooth taper to a point near the bowl, and I keep that port size the same as stock, but smoothed. This helps any pipe "wave reflex" to turn around before it gets to the exhaust valve (or at least lessens it).
Indian valves are big, long, fat stemmed, and very heavy. None of this is good, except that the fat stems actually help to disipate heat away from the exhaust valve. The valve seat is at an unusual 35 degree angle (45 degrees is very common elsewhere). This is actually a better angle than 45 for a big valve that has alot of valve guide clearance (so they say!). They can be trimmed to get off a little weight to help wear, and valve float. Usually, intake valves have a flat head, but the exhaust head rounds over. This makes the exhaust valve very heavy. First, I precisely grind off the shallow dome from the exhaust valve. Then, I grind a slight hollow onto the valve head surface of each valve. Most valves you see today have a hollow shape in the valve head. I can lighten an Indian valve by 14%! Always pick a valve with the "Black-Nitrided" coating. This is a very hard coating that will slow stem wear, and not fail at some point, where an un-coated stem would. It's a good stem coating that is commonly used in the industry.
The best racing solution is to just get Titanium valves, retainers, and keepers to lighten the valve train weight to 60% of factory. I like exotic coatings, and I have my Titanium valve stems coated with "chromium-nitride". It is hard as diamonds. I have had valve guide problems, while I was experimenting with different material, and clearances. In all cases, the stems would look worn, but I could polish them to like-new condition with my "Scotch-brite" wheel. The stems only collected debri from a guide failure, which polished off with NO stem damage. I also found a company named "Balzer-Eirlekon", that will coat any kind of valve stem with a choice of coatings to prevent wear. I use one called "futura-nano". The drag racers use these coatings. Just think, if a stem is super hard, then guide wear won't be caused by a gauled stem.
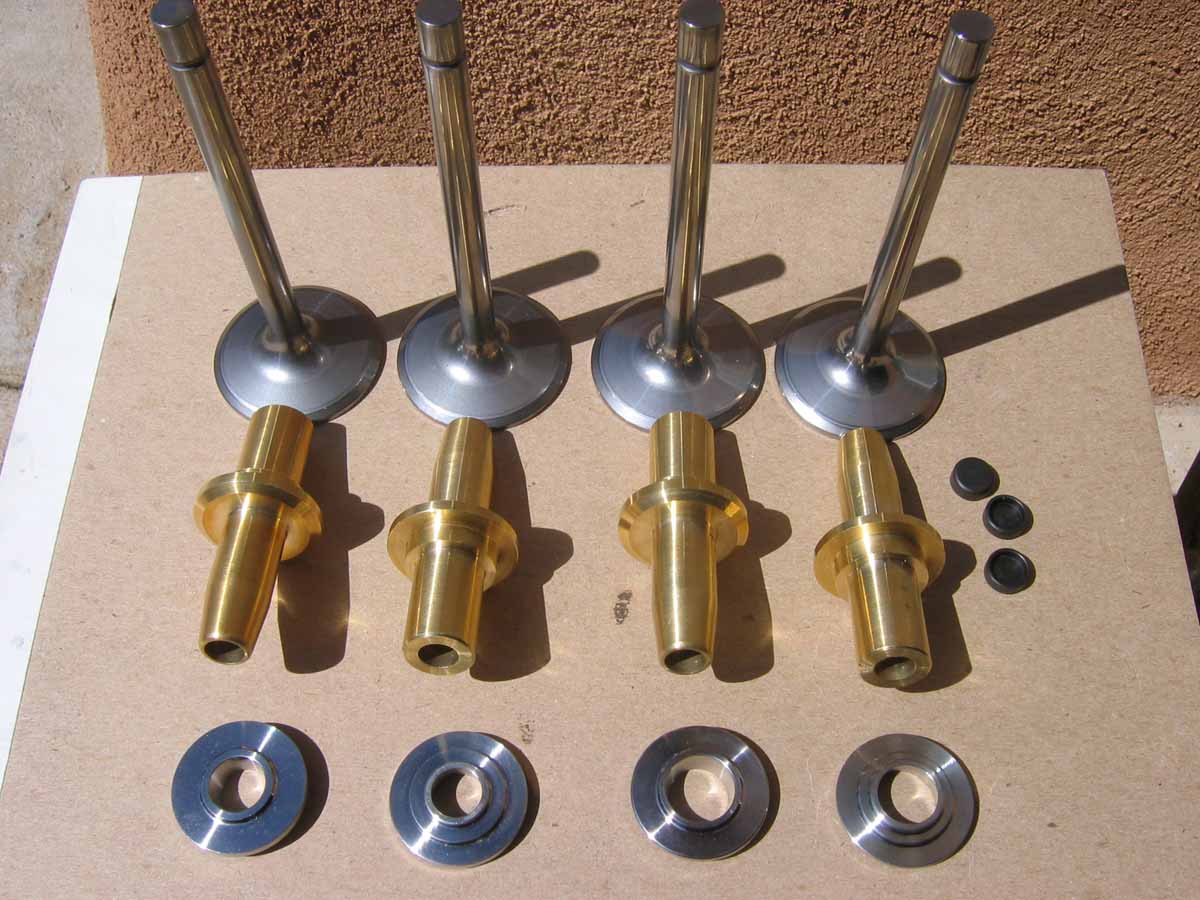
These are my Twin-Scout titanium valves, and retainers. Also shown are my custom bronze valve guides. You can also see a couple black "lash-caps", for the stem end. They are replaceable if worn, but they are super hard anyway. For severe duty valve guides, I make them from "G2 Ductile Iron Blanks". This is very hard iron, and works better than Bronze!
Indian valve guides
Indian always used very hard iron valve guides. Unfortunately, it's hard to find new guides that are as hard. Gary Stark of Starklite Cycle is selling the best guides that I have found. They are very hard, and last a long time. There is no "second best". He is now making a good Scout valve guide, but it's not uncommon to see valve guide holes that are worn large, where even his .002" oversize guides will be too loose. So, then, I make my own guides. I found a very tough iron that can be bought in short blanks,with a precise inner hole, and I finish them on my lathe. You can use either iron, or bronze for intake guides, but I have had troubles using bronze for exhausts. I use "G2 Ductile Iron" for my exhaust guides. It is a super hard iron, and once I hone them, they last under the severe use of my Twin-Scout on Nitrous at Bonneville.
I don't like reaming guides as much as I like honing them. With honing, you get a very straight, and round hole. I use "Pin Guages" in various sizes to test the hole size to get the right stem to guide clearance. I have found that Chief's like .004" for intakes, and .0045"-.005" for exhausts. For Scouts, I like .0035" for intakes, and .004"-.0045" for exhausts. If they are too tight, they will gaul, and stick, or wear alot. If they are too loose, you will get a bad pattern of wear at the valve seats, plus alot of oil consumption.
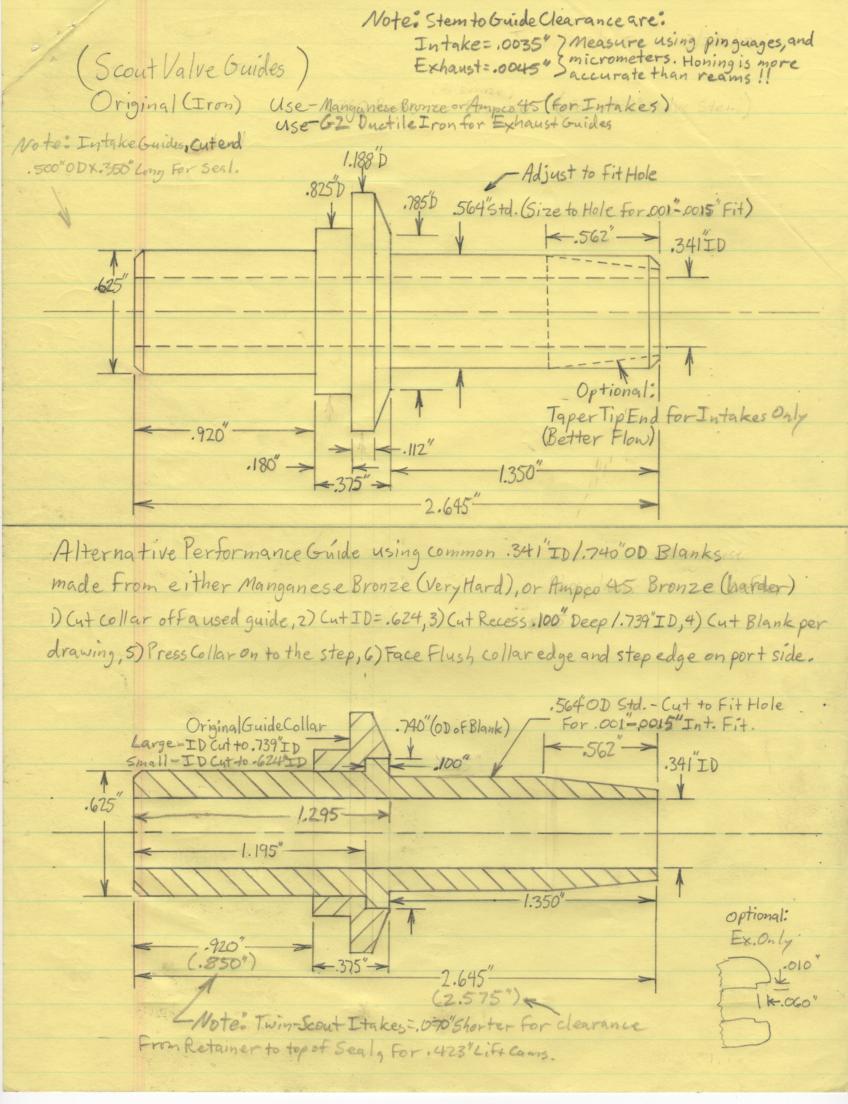
What you see here is my drawing that I use for making custom Scout guides. The upper drawing is for an exhaust, being one-piece made from G2 ductile iron. The lower drawing shows a 2-piece guide, using a collar that can be made, or sampled from a used guide. I buy .750"diameter bronze guide blanks from Goodman Supply for H-D's, to make an intake guide.
Intake Valve Guide Seals
I experimented with using intake valve seals about 20 years ago, with very good results. Face it, virtually every motorcycle engine uses them. I get my seals from Goodman Supply, and they are Teflon with a steel grip ring. They come in 3/8" for Chiefs, and 11/32" for Scouts, or 5/16" for 741's. First, you have to machine your guides to accept them. I make a cut on the lathe that is .500" OD, for a .350" length. Obviously, this is the guide end that is under the spring. Bevel the edge, so the seal will slip on. I make a simple tool to drive them on. Be careful, these seals are delicate. The exhaust valves don't need seals, because there is no vacuum pulling on them from above, and only slight crank pressure forcing in oil from the bottom end. The intakes, though, have crank pressure from below occuring at the same time that the valve is seeing alot of vacuum from the intake charge. This draws up alot of oil, that only coats the combustion chamber with oil, that burns, as well as the valve head, which gets crusty, and worse is the amount of crusty deposits that form on the top of the cylinder wall right next to the intake valve, which eventually break off, and score the pistons, rings, and cylinder walls. This can all be easily stopped with Teflon valve seals.
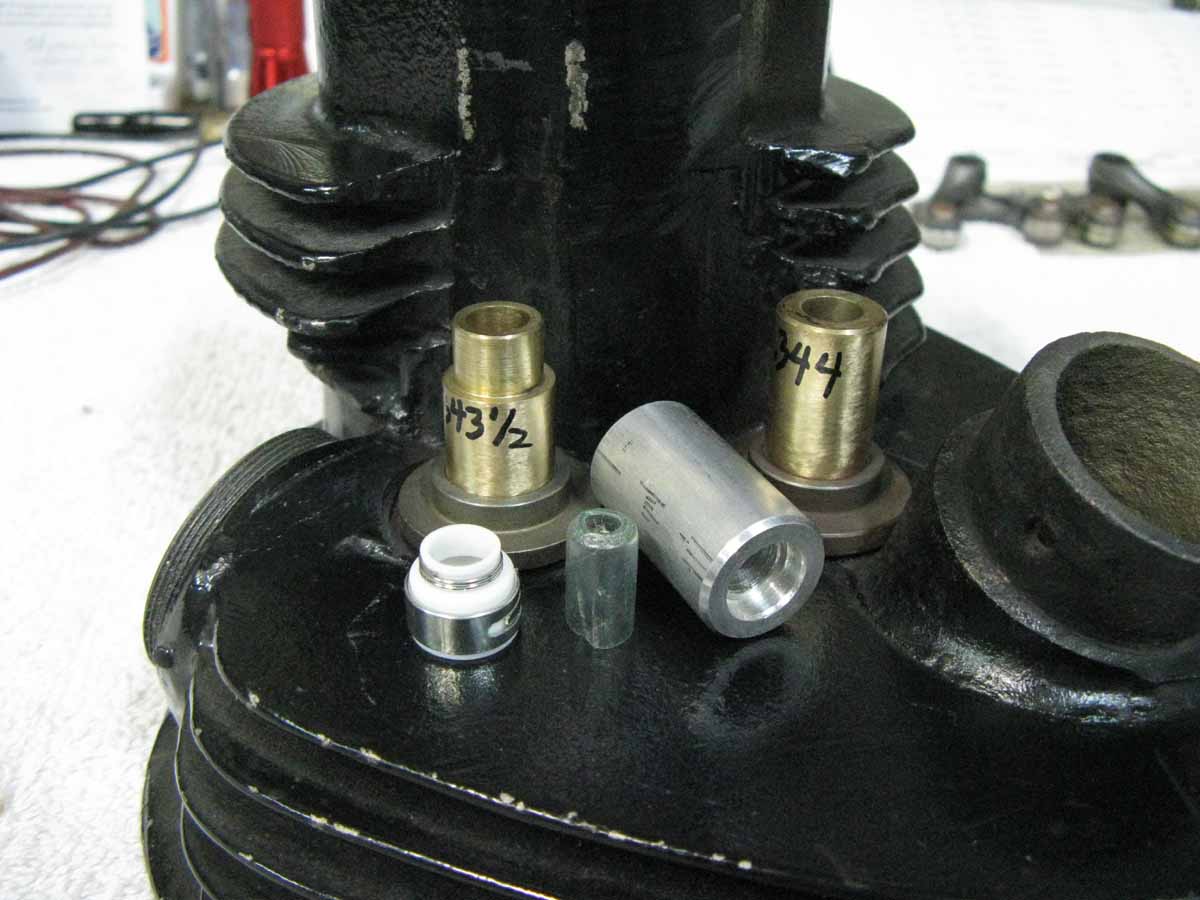
What you see here is a Scout cylinder with my custom made bronze valve guides, with the intake guide cut down to accept the Teflon valve seal. You can see the valve seal, the installation tool, that I made, and a thin plastic sleeve to put over the end of the valve stem to install it through the valve seal. Use some grease for this job!
A Simple Way To Set Spring Pressure
First, you must know the spring pressure rate of a spring. The 7-coil springs that Gary Stark sells are at 162 pounds for each 1" that the spring is compressed. These are not progressive, or bee-hive type springs, so the spring rate is linear. At 1/2" of compression, they are making 1/2 of 162 pounds, or 81 pounds of pressure. So, to get a desired 105 pounds of seat pressure, first we determine what the "Installed Height" needs to be. Devide 105 by 162, and you get (.648). this means that the spring height needs to be .648" shorter than the relaxed length of the spring. This is called the "installed height". Next, you measure the thickness of the fiber gasket under the valve cover (usually .050"), and the thickness of the base of the inner valve cover (usually around .035"). Together, these add up to .085". You will have to measure the distance between the spring perch of the valve retainer, when installed with a keeper, but no spring, valve cover, or thin fiber washer. Measure between the valve guide perch, and the underside of the retainer, then deduct the .085" (for the fiber washer, and valve cover bottom surface). This is, then, the "installed height" distance. Subtract this number from the springs free (uncompressed height, and you can see by how much the spring has been compressed. Multiply this "installed height" by the spring pressure (162) to get the actual seat pressure. Now, you can shim under the valve cover to increase the seat pressure to what ever you want by first deciding what you want for seat pressure. If the spring is 162 pounds per inch of compression, and you want 105 pounds, then devide 105 by 164 to get (.648). That's actually .648" of spring compression, so, when you install a valve, and retainer, and keepers only, you measere the distance where the spring sits, deduct .085" for the fiber washer, and valve cover to get a height. Now, how much different is it than the .648"?. That's the amount of shimms that you need to end up with the .648" "installed height" for a 105 pound seat pressure. It is always best to make every valve seat pressure the same (assuming each valve weighs the same).
For more help, and a sample work sheet, go to my "Valve Spring Study"
You can also calculate the "maximum spring pressure" at maximum lift by first establishing your seat pressure. Then you will add pressure as the valve lifts. If the cam has a .400" lift, while using the 7-coil spring with 162 pounds per 1" of compression, then multiply .400 by 162. You get 64.8 pounds. Add the 64.8 to the 105 seat pressure, and at .400" lift, you get 169.8 pounds of max-lift pressure. Get it? Good!
CONTACT INFORMATION:
James R. Mosher
(505) 466-7870